Tuesday, November 29, 2011

Bathtub Art

I found this idea on Pinterest earlier this summer and it has become a regular event at our house.  Olive asks to "paint" in the bathtub several times a week.  All you need is shaving cream and food coloring!  Add a few drops of color to a big glob of shaving cream, mix and they are ready to go!  This is a great way to get in number and letter practice too!
The best part is getting to do the "SPLASH" to clean it off the wall.
I always rinse her hair before I let her splash, that way her hair doesn't smell like shaving cream!  She loves watching the water turn different colors.  
Helpful hint: Don't let the little one help squirt the food coloring or you may end up with a blue hand for a few days!  Oops!

Monday, November 28, 2011

Egg carton painting

For this project you will need: washable paint, cut apart egg cartons, glitter and paper.
Use the egg carton to cover the paper with green spots.
 
 Choose several other colors and paint separate pieces of paper. 
 Let your paper dry and then cut the shapes out that you want to use.  Since it is Christmas, we cut it into a tree, ornaments and a star.
 Glue the "ornaments" to the tree.
 And then, shake some glitter over the ornaments to make them shiny!
 Ta-da!  We are using our's as a tree topper.  It's beautiful!

Saturday, November 26, 2011

Thankful Hands


I wanted to make a cute Turkey centerpiece for Thanksgiving, so we decided to make a Thankful turkey!  I traced the kids hands on construction paper.


Then I asked the kids what they were thankful for and wrote it in the middle of the hand.  I added their names and ages and then made a couple extra of each of their hands to fill in the turkey feathers.


Then we gave our turkey a little face (using the construction paper scraps) and drew on some eyes and glued the "feathers" on him!  I think it will be a hit on Thanksgiving!

Wednesday, November 23, 2011

I am THANKFUL for...

We have so much to be thankful for this Thanksgiving season. I decided to let the girls tell me what they were most {thankful} for this year. To begin this project, I just whipped up a templete in word that I thought would be easy for my girls to use.
 We then sat down and discussed what we were all thankful for this year. Of course, my oldest was pretty quick to tell me, Mommy & Daddy, her sister, MeMe & PaPaw & Meme & PePaw. As for my youngest, who will be two in January, she just said what came to her mind, Daddy, Mommy, Haddee and babies!
They each drew pictures to describe the words and then my oldest wrote the words.


The final product. I know it isn't anything fancy, but it is something meaningful that we have displayed on their bullentin board to discuss daily. Sometimes the simplest things are the most meaningful!
Happy Thanksgiving!

Classic Turkey!

This is a delicious Thanksgiving craft that I swear I made for at least ten years as a child!  I had actually forgotten about it until this year when I stumbled across some Thanksgiving activities on pinterest.  It made me smile to bring out the supplies for my little one this year, and I look forward to doing it with her for many years to come!
 
(the photos are lacking on this post because we were trying to get the whole thing done while little brother napped...our set up was hurried, but the end result was fun!)

The supplies for this activity can really be just about anything you have on hand.  For our edible turkey, we used an apple, marshmallow confetti, toothpicks, reese's cups and a powdered sugar glaze, but you could get creative and use just about anything you can find in your pantry!
 
Once you have your supplies ready, go to work...or start eating the supplies!  :D

Because lil' C is only two, I did most of the arranging, but she chose the colors for each thing and counted as we put them on.  It is a fun way to practice colors and compare more and less!  To make the feathers, simply stick toothpicks in an apple (or your fruit of choice--oranges would smell delicious), and then thread on items to build feathers.  We used marshmallow confetti, but cheerios, popcorn, or dried fruit would all work well too.  After we had built feathers to our hearts' content, we made a face using a reese's cup secured by toothpicks to the apple.  Then we dipped marshmallows in a powdered sugar glaze (powdered sugar and water mixed until thick and sticky) and arranged them on the face. And yes my child is still in her pajamas at three p.m.; she wore them all day long.  It was one of those days! 

Our finished product!  Notice the random yellow marshmallow on the turkey's face.  Chloe informed me that it was his hat and insisted it go there--silly girl!  These would make adorable place card holders or decorations if they lasted around your house for more than a day (good luck with that!)!


Have a happy Thanksgiving!

Tuesday, November 22, 2011

Tom Turkey

 This is the simplest Thanksgiving craft! 
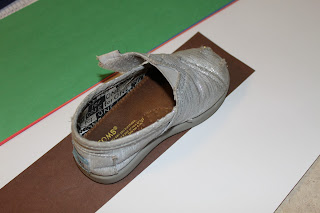
 Start by tracing (or having them trace) one of your child's shoes to make the turkey's body.  
  
 You will also need small squares of multi-color construction paper and glue. 
 Glue down the turkey's body and then make glue dots every where the feathers will go. 
 Then start putting down the squares on the glue dots. 
Push them down hard so they stick!  Tongue out, optional!
 And admire your beautiful turkey!
 

Monday, November 21, 2011

Fluffy Feathered Turkeys

We made a "beautiful" paper bag turkey with foamy textured feathers.  This was a multi-day project for us because we had to wait for the feathers to dry.  
To begin you will need: shaving cream, acrylic paint in a variety of colors, a straw or stick for stirring, paper cut into the shape you want, brown paper bag, scrap paper, googly eyes and a very eager artist!
 
Start by putting a big glob of shaving cream in a pan. 
Then let your little artist begin squeezing in paint drops as they see fit. 
Next you need to swirl the paint into the shaving cream mixing the colors together.  
Push your paper down into the shaving cream.  
Set aside to dry.  (They dry with a puffy texture)
Next you will create the turkey's body.  I decided since our feathers were gigantic, we would do a stuffed paper bag turkey body.  Olive got to coloring the turkey's body, and of course, it has a rainbow body.  
 This was the best part for Olive, scrunching the paper!  After you have it good and smashed, put it in the bag and staple the opening together. 
 Put glue on the back of the bag and smoosh the feathers onto the bag.  You can take a juice break during this step if you want to! 
We sat an empty coffee container on the turkey to hold the feathers in place while they dried. 
  And wah-la!  Our beautiful turkey! Perfect for the Thanksgiving buffet!

Saturday, November 19, 2011

Canvas Paintings

I had been wanting to add some personalized art work in the kid's playroom so we finally had a free weekend and we decided to make some canvas paintings with the kid's initials.

Supplies:   (I got all of ours at hobby lobby!)
  • blank canvas
  • acrylic paints
  • paint brushes
  • masking tape 
We made an inital out of masking tape.  Then got on our painting clothes and they were ready to go!


Let the painting begin!!

Finally, all done! We let them dry all the way and then peeled off the tape to reveal their initial!

I just love the way they turned out! So telling of their little personalities!

Friday, November 18, 2011

Planting Pansies


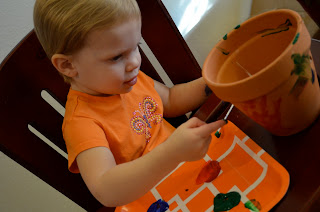
 I have been wanting to add a little color to my porch lately. The pumpkins just weren't cutting it anymore. I ran by Lowe's today and they have pansies on sale for .50 cents! Now, they're little sad pansies, but with a little love they'll be great! I hope! :) And what better way to jazz up a pot then let a sweet girl paint on it!  

The pot and pansies!
Pretty fall colors
Our sweet audience member!
You have to do the occasional handprint!


I'm a sucker for these sweet hands!


We started with a foam brush
Then moved to a q-tip! Thanks to yesterdays post!
Then dug in with our hands! MESSY! 

We added the dirt! And yes, we're inside! It's just too cold outside!
Planting our flowers and admiring the pretty flowers!

And this is our finished product! And the best picture I could get of her! 2 year olds! Ha! :)